
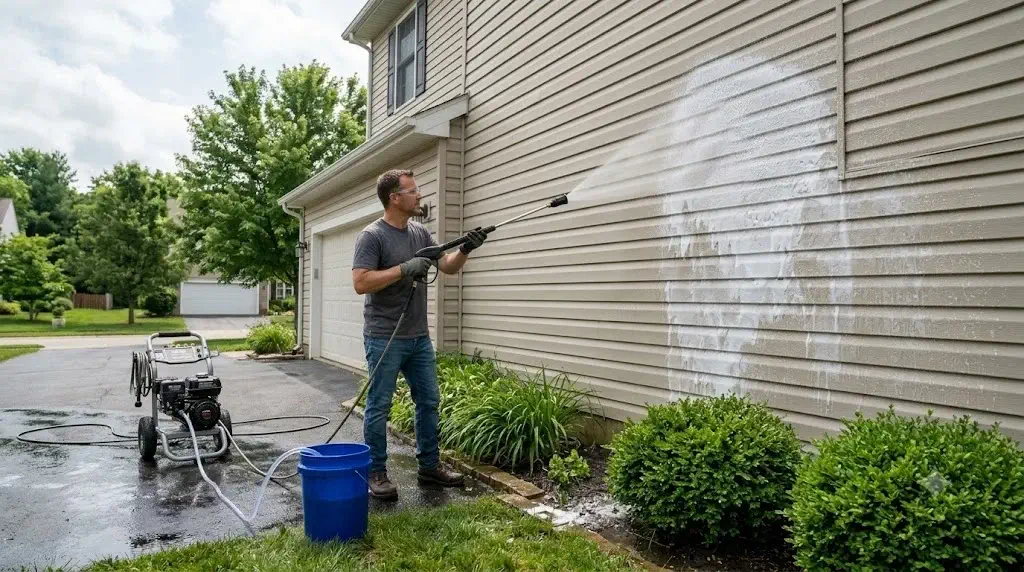
How to Use Pressure Washer Detergent: Step-by-Step Guide
Updated August 2026 • HomeGearMax Pressure Washer Guide • Substrate Chemistry & Siphon Dynamics
Using pressure washer detergent correctly is fundamentally an exercise in fluid dynamics and surface chemistry rather than simply dumping soap into an onboard reservoir. The mechanical water stream provides the kinetic energy to transport chemistry and rinse contaminants, but the detergent formulation performs the molecular work of breaking interfacial electrostatic bonds between soils and substrates.
A systematic procedure requires seven operational steps: identifying the structural material, selecting a chemically compatible surfactant, determining the machine’s chemical induction mechanism, calculating primary versus secondary dilution ratios, spraying under low hydraulic pressure, managing the active chemical dwell window, and executing a controlled freshwater rinse.
To use pressure washer detergent, verify substrate chemical safety, connect your delivery system (downstream venturi injector, onboard tank, or foam cannon), install a wide-bore low-pressure soap nozzle (65° black tip) to generate the necessary vacuum pressure differential, apply the diluted surfactant from the bottom upward in overlapping horizontal strokes, maintain a 3- to 8-minute dwell time without allowing the film to dry, and execute a comprehensive top-down freshwater rinse using a 25° or 40° nozzle.
A pressure washer’s ability to draw soap does not mean all detergents are universally safe across building materials. High-pressure pumps and downstream injectors function strictly as fluid meters; applying an aggressive alkaline degreaser or unbuffered chlorine bleach to automotive clear coats, unsealed limestone, or factory-enameled aluminum siding can cause permanent surface etching, discoloration, and structural degradation.
Quick Reference Specification: Pressure Washer Detergent Injection & Surface Chemistry Matrix
Direct engineering benchmarks outlining delivery system physics, operating pressure ranges, working dilutions, and optimal surface contact durations.
| Delivery Architecture | Operating Pressure (PSI) | Secondary Dilution Ratio | Optimum Dwell Time | Required Nozzle Tip | Primary Surface Compatibility |
|---|---|---|---|---|---|
| Downstream Injector (Venturi) | 150 – 250 PSI (Draw Mode) | 10:1 to 20:1 (Water-to-Soap) | 5 – 10 Minutes | 65° Black Soap Nozzle (Orifice 4.0+) | Vinyl siding, painted wood clapboard, brick veneers, stucco. |
| Onboard Reservoir (Internal Siphon) | 100 – 200 PSI | 7:1 to 12:1 (Fixed Venturi) | 3 – 5 Minutes | Low-Pressure Soap Tip or Dial Wand | Patio furniture, light deck washing, composite boards, walkways. |
| Foam Cannon (Aerated Aerator) | 1,100 – 3,000 PSI (Pump Full) | 1:5 to 1:10 (Bottle Mix) | 4 – 6 Minutes | Internal 1.1 mm or 1.25 mm Jet Orifice | Automotive clear coats, gel-coat marine hulls, glass, painted metals. |
| Manual Dedicated Soft-Wash Pump | 60 – 100 PSI (Diaphragm) | Pre-batched direct tank mix | 10 – 15 Minutes | Chemical poly-wand flat fan tip | Asphalt roof shingles, historic lime mortar brick, fragile cedar shakes. |
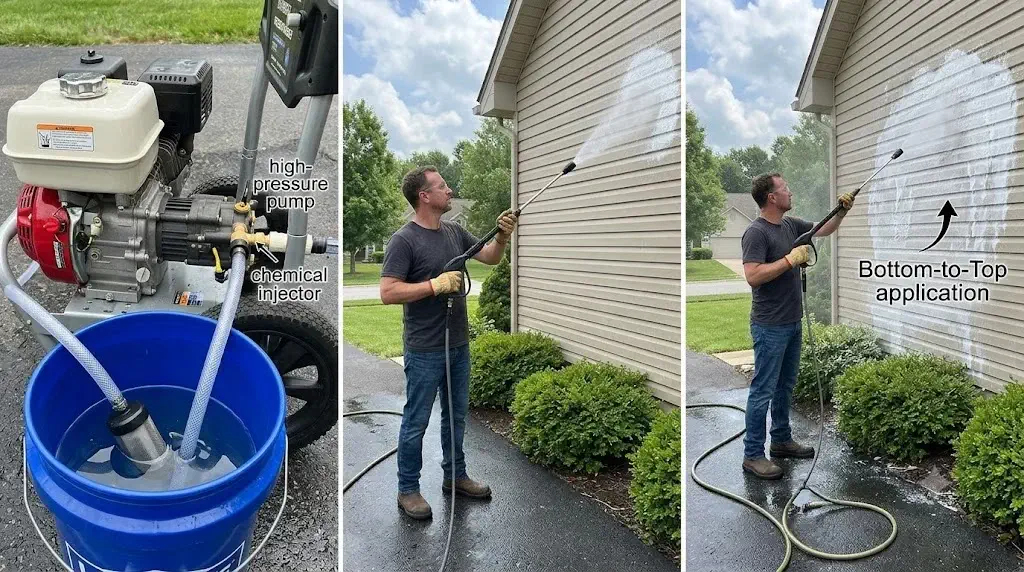
Sequential Application Protocols Govern Safe Pressure Washer Detergent Deployment
Applying exterior detergents follows an exact physical order that prevents chemical streaking and pump valve damage. Skipping preliminary inspections or applying concentrated soap directly to hot, dry surfaces causes surfactants to bake instantly into painted resins or vinyl panels, leaving chalky mineral deposits that require aggressive compounding to fix.
| Operational Stage | Action Required | Technical Objective |
|---|---|---|
| 1. Substrate Audit | Classify wood, vinyl, concrete, or vehicle paint | Prevents chemical burning, paint etching, and seal failure. |
| 2. Chemical Matching | Select surfactant matrix matching soil chemistry | Targets organic algae or petrochemical oils specifically. |
| 3. Hardware Setup | Configure injector, reservoir, or foam cannon | Establishes the required hydraulic pressure differential. |
| 4. Dilution Mix | Calculate primary and secondary dilution yields | Prevents waste and guarantees active surfactant levels. |
| 5. Low-Pressure Spray | Apply bottom-to-top using 65° soap tip | Eliminates chemical run-down drip marks on dry siding. |
| 6. Controlled Dwell | Maintain wet surface contact for 3–8 minutes | Allows active wetting agents to loosen soil electrostatic bonds. |
| 7. High-Volume Rinse | Flush top-to-bottom using 25° or 40° tip | Carries emulsified soils down and away from clean surfaces. |
Equipment Assemblies Require Matched Chemical Siphons and Calibrated Spray Nozzles
Successful detergent delivery depends on hardware compatibility between the pressure washer pump and the chemical induction system. Mismatched nozzle orifices or undersized supply hoses prevent the pressure drop needed to draw soap, reducing fluid delivery to plain water.
- Pressure Washer Unit: Gas or electric unit delivering a minimum of 1.8 to 4.0 GPM for efficient detergent induction and soil evacuation.
- Low-Pressure Brass Soap Nozzle (Black Tip): 65° fan angle with a 4.0 to 5.0 mm orifice bore to drop backpressure below 250 PSI.
- Chemical Delivery Hardware: Downstream brass venturi injector, onboard metering reservoir, or dedicated brass-manifold foam cannon.
- Chemical Siphon Hose & Filter: Reinforced 1/4-inch PVC braided tubing equipped with a stainless steel mesh debris strainer and ceramic check ball.
- Concentrated Detergent: Substrate-calibrated surfactant formulation (alkaline house wash, wood restorer, or pH-neutral automotive shampoo).
- Personal Protective Equipment (PPE): Indirect-vent chemical splash goggles, nitrile gloves, and slip-resistant rubber work boots.
For large residential jobs, pairing your machine with an ergonomic trigger assembly from our best pressure washer guns guide prevents hand cramping during long chemical application passes.
Specialized Detergent Chemistries Target Distinct Organic and Petrochemical Contaminants
Pressure washer detergents utilize tailored pH builders, chelating agents, and wetting surfactants engineered for specific types of soil. Using a single “all-purpose” soap across different exterior surfaces leads to poor cleaning on tough soils and risks damaging sensitive finishes.
| Detergent Class | Active Chemical Matrix | pH Range | Primary Substrate Target | Vehicle Safe? |
|---|---|---|---|---|
| Automotive Shampoo | Anionic surfactants & gloss polymers | 6.5 – 7.5 (Neutral) | Clear coats, wrap films, glass, wheels. | Yes |
| House & Siding Wash | Amphiphilic surfactants & mild builders | 8.5 – 10.5 | Vinyl siding, painted wood, Hardie board, gutters. | No |
| Wood Deck Cleaner | Sodium percarbonate / Metasilicates | 9.0 – 11.0 | Pressure-treated pine, cedar, redwood, composite. | No |
| Concrete Degreaser | Sodium hydroxide & butyl solvents | 12.0 – 13.5 (Caustic) | Poured concrete flatwork, driveways, pavers. | No (Severe damage) |
| Mildewcide / Biocide Wash | Quaternary amines or buffered hypochlorite | 11.0 – 12.5 | North-facing siding, masonry, retaining walls. | No |
Surface Porosity and Contamination Chemistry Determine Proper Detergent Selection
Choosing the right exterior detergent requires analyzing the target surface and the type of grime present. Atmospheric pollution, diesel exhaust, and road films are held by an oily binder that requires wetting surfactants to break down, whereas green algae (Gloeocapsa magma), mold, and lichen spores require targeted biocides to neutralize root structures.
Porosity also dictates chemical behavior. Dense, non-porous surfaces like PVC siding and vehicle clear coats keep detergents on the surface where they work quickly; porous substrates like unsealed brick, masonry mortar, and aged wood clapboard absorb liquids, requiring pre-wetting with fresh water to prevent chemicals from soaking deep into the material.
Mechanical Delivery Architectures Regulate Downstream Chemical Induction Ratios
Residential pressure washers deliver detergent through three primary systems, each with distinct operating physics, chemical compatibility profiles, and dilution behavior.
| System Type | Mechanical Principle | Key Advantage | Operational Limitation |
|---|---|---|---|
| Downstream Injector | Post-pump venturi constriction creates vacuum at low pressure. | Keeps chemicals completely out of the pump manifold, protecting internal valves. | Will not draw through high-pressure nozzles or hoses longer than 100 feet. |
| Onboard Reservoir | Integrated frame tank feeds an internal manifold siphon. | Self-contained design requires no loose suction hoses or chemical buckets. | Fixed siphon ratio; harsh chemicals can degrade internal tank grommets. |
| Foam Cannon | Lance-mounted aerator mixes high-pressure water, air, and soap. | Produces thick foam that clings to vertical painted surfaces. | Limited 1-liter bottle capacity requires frequent refills on large jobs. |
Venturi Injectors Utilize Low-Pressure Differential to Siphon Chemical Solutions
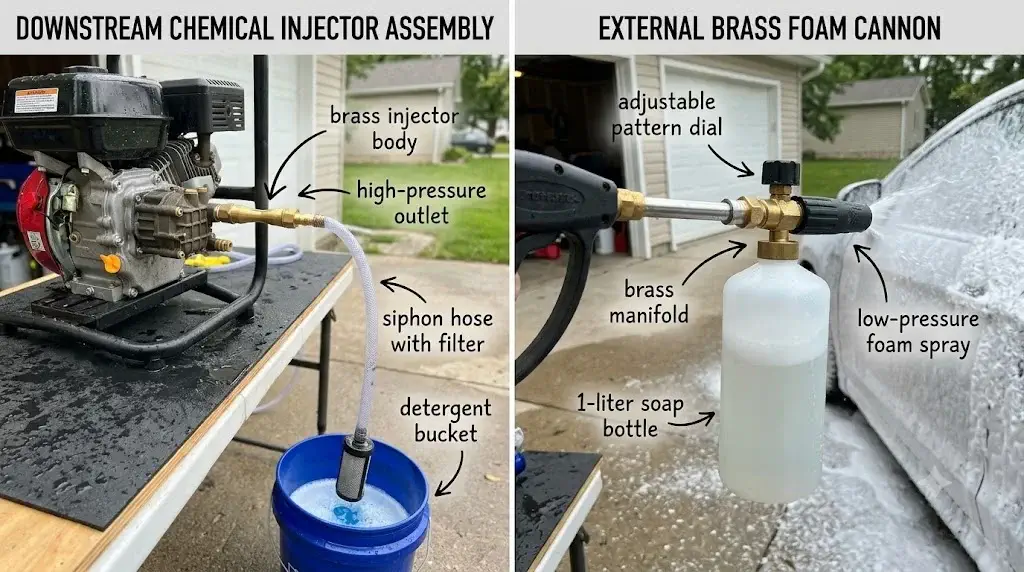
Downstream chemical injectors operate on Bernoulli’s principle: as pressurized water flows through an internal constriction, fluid velocity increases while static pressure drops, creating a vacuum that draws soap into the water stream after the pump.
Connect Downstream Valve Directly to the High-Pressure Water Outlet
Snap the quick-connect plug of your downstream injector directly into the pressure washer’s high-pressure outlet, ensuring the directional flow arrow points down the hose toward the spray gun.
Place Suction Strainer into the Concentrated Chemical Bucket
Submerge the chemical pickup hose and its stainless mesh filter into your detergent pail. Keep the strainer at the bottom of the bucket to prevent the siphon from pulling air bubbles into the line.
Snap the Black 65° Brass Nozzle into Your Spray Wand
Insert the wide-bore black soap tip into the quick-connect coupler on your spray wand. This wide opening drops line pressure below 250 PSI, generating the pressure differential needed to open the siphon check valve.
Insert a High-Pressure Tip to Stop Chemical Siphoning Instantly
Once chemical application is complete, replace the black soap tip with a 25° green or 40° white nozzle. The smaller orifice restores system pressure above 1,500 PSI, automatically closing the siphon valve and delivering clean rinse water without walking back to the machine.
Integrated Onboard Tanks Require Post-Operation Freshwater Flushing Protocols
Onboard chemical tanks built into electric and consumer gas pressure washers pull detergent through an internal unloader siphon. Because detergent sits inside the machine frame, failing to flush the reservoir allows dried chemical salts to crystallize inside brass needle valves and rubber seals, causing siphon failure on future jobs.
After completing your wash, drain any leftover detergent back into its original container. Fill the tank with two quarts of warm fresh water, install the black soap nozzle, and run the spray gun for 60 seconds to flush clean water through the pickup tubes, metering dial, and internal siphon manifold.
Foam Cannons Aerate Surfactant Solutions into Clinging Pre-Wash Envelopes
Foam cannons connect to the end of the spray wand, using high-pressure water forced through a tiny 1.1 mm to 1.25 mm jet orifice to create high-velocity suction that pulls soap from an attached 1-liter bottle. The mixture passes through an internal stainless steel mesh aerator, whipping air into the liquid to create dense foam that clings to vertical painted surfaces.
To use a foam cannon for automotive pre-washing, fill the bottle with 2 to 3 ounces of quality automotive shampoo, topping it with warm water. Turn the top adjustment knob toward the “-” setting to maximize soap draw and adjust the front barrel fan pattern to cover vehicle panels evenly, allowing the foam to encapsulate road grit before hand washing.
Mathematical Dilution Equations Account for Primary and Secondary Injection Ratios
Calculating detergent concentration requires accounting for two distinct dilution stages: primary dilution (pre-mixing concentrate with water inside a reservoir) and secondary dilution (the water added by the pressure washer’s downstream injector as it siphons soap).
Example: (1 Part Chemical : 4 Parts Water) × (1 Part Siphon : 10 Parts Machine Flow) = 1:50 Final Surface Dilution
Assuming a bottle concentrate hits the wall at its package strength is a common mistake. Most downstream injectors dilute chemicals at a 10:1 to 20:1 ratio, meaning concentrated siding washes can often be siphoned straight from the jug without pre-diluting in a separate bucket.
Bottom-Up Chemical Application Prevents Vertical Siding Rundown Channeling Marks
Always apply exterior detergent from the bottom of the wall upward in smooth, overlapping horizontal passes. Spraying detergent from the top downward causes concentrated soap to run down dry siding, cutting clean vertical channels that absorb extra chemical and leave visible streak marks on final rinse.
Starting at the foundation ensures that any chemical runoff flows over surfaces that are already uniformly wet with soapy solution. Maintain a steady 2- to 3-foot working distance with your wide black soap nozzle, overlapping each horizontal pass by roughly 30 percent to guarantee complete coverage across every siding lap.
Active Dwell Intervals Allow Wetting Surfactants to Dissolve Interfacial Soil Bonds
Dwell time is the crucial window during which chemical surfactants break down embedded grime, emulsify airborne oils, and kill organic spores. Rinsing too quickly flushes away active cleaners before they finish working, while letting detergent sit too long risks having it bake onto the surface in warm weather.
Top-Down Freshwater Rinsing Flushes Emulsified Soils Completely Off Building Facades
While soap application moves from the bottom upward, rinsing must always proceed from the top downward. Rinsing from the top ensures that dislodged dirt, suspended silt, and soap residue wash steadily downward toward foundation drainage rather than contaminating sections you have already cleaned.
Switch to a wide-fan rinsing tip (a 25° green nozzle for concrete or a 40° white nozzle for siding and paint), holding the spray tip 3 to 4 feet away from the wall. Work across the wall in smooth horizontal sweeps, paying special attention to horizontal siding overlaps, window frames, and trim details where soap residue tends to collect.
Automotive Pre-Wash Rinsing Requires pH-Neutral Foams to Protect Sensitive Clear Coats
Automotive clear coats demand gentle, pH-neutral shampoos that lubricate road grit without stripping factory sealants, ceramic coatings, or carnauba waxes. High water pressure alone cannot replace proper wash chemistry; blasting dry automotive finishes with high PSI grinds gritty road dust into the clear coat, causing fine swirl marks and micro-scratches.
Apply a thick blanket of automotive foam using a foam cannon, allow it to dwell for 4 to 5 minutes to lift surface grime, and rinse thoroughly from the top down before touching the paint with a microfiber mitt. For cleaning vehicle undercarriages and wheel arches after road trips, consult our dedicated best undercarriage cleaners guide.
Exterior Siding Soft-Washing Eliminates Deep-Seated North-Facing Mildew Blooms
Exterior claddings like vinyl lap, cedar siding, and synthetic stucco are vulnerable to moisture and high-pressure damage. Directing high-pressure water wands upward forces water through lap seams and weep holes, saturating sheathing insulation and creating hidden wall cavity mold.
Soft-washing relies on low-pressure chemical delivery to lift mold, mildew, and traffic film safely. If you are comparing specific exterior siding formulations or working dilution rates, our technical audit of the best house wash detergent formulas details the dwell times and substrate safety profiles of top-rated cleaners.
Timber Deck Restorers Rely on Oxygen Bleach Cleaners Rather Than Destructive High PSI
Natural pressure-treated lumber, cedar boards, and composite decking are easily scarred by narrow high-pressure spray tips. High pressure gouges soft springwood grain, tears wood fibers into fuzzy splinters, and permanently damages the protective capped polymer shells on composite deck boards.
Use an oxygenated deck cleaner (such as sodium percarbonate) applied through a downstream siphon or pump sprayer. Let the solution dwell for 10 minutes to dissolve gray UV-damaged wood cells and slippery algae, then rinse gently parallel to the wood grain using a wide 40° nozzle held at least 2 feet away, keeping surface pressure under 1,000 PSI.
Heavy Concrete Flatwork Requires Alkaline Degreasers and Surface Cleaner Discs
Poured concrete driveways and paver walkways have porous structures that absorb motor oil drips, tire rubber marks, and ground-in clay dirt. Standard exterior soaps lack the alkalinity required to break down heavy hydrocarbons embedded deep within concrete pores.
Apply an alkaline concrete degreaser directly to oil stains, allowing 10 to 15 minutes of dwell time before scrubbing stubborn spots with a stiff-bristle broom. For uniform, streak-free cleaning across wide driveways, pair your chemical wash with a rotary surface cleaner attachment rather than relying on a standard spray wand.
Asphalt Roof Shingles Demand Non-Pressurized Soft-Wash Biocides to Prevent Granule Loss
Asphalt roofing shingles feature ceramic mineral granules that protect asphalt waterproofing cores from UV solar radiation. Directing high-pressure water wands at shingles strips these protective granules instantly, leaving bare asphalt that blisters, curls, and leaks under summer heat.
Roof cleaning should always be handled with specialized low-pressure soft-wash pumps running under 100 PSI. Technicians apply a buffered chemical biocide mix that neutralizes black Gloeocapsa magma algae streaks, allowing natural rainfall to wash away dead organic matter without walking on or power-washing fragile shingles.
Dissolved Hard Water Minerals Deactivate Anionic Surfactants and Cause Surface Spotting
Hard water contains elevated concentrations of dissolved calcium and magnesium ions that chemically bind with surfactant molecules, reducing foam creation and leaving cloudy mineral rings behind as rinse water dries on glass and vehicle clear coats.
When washing in areas with hard water, select exterior detergents formulated with chelating additives (such as tetrasodium EDTA) that bind mineral ions before they interfere with cleaning. On glass and dark vehicle finishes, dry the surface immediately with clean microfiber drying towels to prevent white water spots.
Freezing Ambient Temperatures Alter Chemical Viscosities and Risk Internal Pump Rupture
Washing in temperatures below 45°F (7°C) slows down chemical cleaning reactions, requiring double the dwell time to break down heavy grease films. Below 32°F (0°C), residual rinse water freezes inside pump manifolds, brass valves, and high-pressure hoses, causing catastrophic metal cracking.
Never run pressure washer equipment during freezing weather. When winterizing your setup, flush the detergent siphon system with fresh water and draw pump protector antifreeze through the intake until colored fluid exits the discharge port, safeguarding internal valves from freeze damage.
Comprehensive Personal Protective Equipment Mitigates High-Pressure Chemical Exposure
Pressure washer detergents combine active chemical builders with pressurized spray mists that can cause serious eye irritation, skin burns, or accidental plant damage if handled carelessly.
- Wear Eye Protection: Wrap-around chemical splash goggles shield eyes from fine chemical mist blown by wind gusts.
- Pre-Wet Landscaping: Thoroughly soak grass, foundation shrubs, and flower beds with clean water before and after washing to dilute chemical overspray.
- Never Mix Incompatible Chemicals: Combining chlorine bleach with acids or ammonia-based cleaners releases toxic chloramine gases.
- Review Operational Guidelines: Review our comprehensive pressure washing safety guide for critical equipment operating pressures and electrical safety rules.
Common Application Errors Induce Permanent Building Substrate and Equipment Damage
- Using High-Pressure Tips to Spray Soap: Siphon check valves remain closed at high pressure; you must use the wide black soap nozzle.
- Letting Detergent Dry on Siding: Surfactants baked by hot sun leave chalky white chemical streaks that are difficult to rinse clean.
- Using Dishwashing Liquid: Household dish soaps create excessive foam that causes pump cavitation and lack mildew-fighting biocides.
- Spraying Downward on Dry Siding: Top-down soap application creates dirty runoff streaks that leave permanent drip marks.
- Ignoring Hose Length Limits: Downstream injectors lose suction if your high-pressure hose exceeds 100 feet in length.
- Skipping Landscape Pre-Wet Passes: Dry plant roots rapidly absorb chemical overspray, causing brown leaf burns.
- Spraying Siding at Upward Angles: Pressurized water driven upward penetrates lap joints and floods interior wall insulation.
- Holding Spray Wands Too Close: Concentrated water jets strip exterior paint and scar wood siding.
- Forgetting to Flush Siphons: Chemical salts left inside injectors corrode internal stainless steel check-valve springs.
- Using Caustic Degreasers on Vehicle Paint: High-pH cleaners strip clear coat gloss and etch aluminum window trims.
Mechanical Diagnostic Checklists Resolve Common Detergent Siphon Failures
When a pressure washer fails to draw detergent, the issue is almost always a mechanical restriction or incorrect nozzle selection rather than a defective pump.
| Symptom | Root Cause | Corrective Action |
|---|---|---|
| No chemical suction | High-pressure nozzle installed | Insert wide-bore black brass soap nozzle (65°). |
| Intermittent siphon flow | Clogged pickup strainer or air leak | Clean mesh filter and tighten siphon hose clamps. |
| Stuck siphon check valve | Corroded stainless steel check ball | Disassemble injector barb, clean ball, and lubricate spring. |
| Excessive hose backpressure | High-pressure hose exceeds 100 feet | Shorten discharge hose or use high-draw 2.1 mm injector orifice. |
| Weak foam from cannon | Clogged internal mesh tablet | Soak aerator in vinegar or install a new stainless mesh filter. |
Decision Framework Matches Project Scopes to Optimal Delivery Hardware
Select the right equipment and chemical setup for your specific cleaning project using the guidelines below:
Frequently Asked Questions
How do you use detergent with a pressure washer?
Select a substrate-compatible chemical, connect a downstream injector or fill the onboard reservoir, snap in the low-pressure black soap nozzle to activate suction, apply bottom-to-top, let dwell for 5 minutes, and rinse top-to-bottom with a wide-fan tip.
Do you put detergent in a pressure washer?
Never pour detergent into the water supply hose or pump inlet manifold. Detergent should only be placed into an onboard reservoir, drawn through a post-pump downstream injector, or loaded into an external foam cannon bottle.
What setting do I use for pressure washer detergent?
Use the low-pressure black brass soap nozzle (65° spray pattern with a wide 4.0 mm orifice). This wide opening drops line pressure below 250 PSI, which is necessary to create the suction vacuum that opens the chemical check valve.
Do you use pressure washer detergent before or after water?
Pre-wet hot surfaces, delicate plants, and porous brick with clean water first to prevent flash drying. Then apply detergent, allow the recommended dwell time, and finish with a thorough top-down freshwater rinse.
Why won’t my pressure washer suck up detergent?
The most common cause is leaving a high-pressure rinse nozzle installed instead of the black soap nozzle. Other frequent issues include a stuck check-valve ball, an air leak in the suction hose, or using a high-pressure hose longer than 100 feet.
Can you use regular dish soap in a pressure washer?
No. Household dish soaps create excessive foam that causes pump cavitation and lacks the mildew-fighting biocides needed for exterior cleaning. Always use detergents formulated specifically for pressure washers.
How long should pressure washer detergent sit?
Most exterior detergents require a dwell time of 3 to 8 minutes to break down grime. Never let the detergent dry on the surface; if it starts drying on a warm day, lightly mist it with fresh water to keep it active until rinsing.
Can I use pressure washer detergent on my car?
Only use detergents explicitly labeled as automotive shampoos. Siding cleaners, degreasers, and deck washes contain harsh alkaline builders that will strip vehicle wax, cloud plastic trim, and etch clear coat finishes.
Balancing Chemical Compatibility with Controlled Pressure Protects Home Value
Mastering how to use pressure washer detergent transforms exterior cleaning from exhausting, high-risk manual labor into an efficient, controlled chemical process. The pressure washer provides water volume and rinsing velocity, but the chemical formula does the heavy lifting of breaking surface soil bonds.
By matching detergents to surface materials, taking advantage of downstream venturi suction with low-pressure nozzles, applying bottom-up to prevent streaking, and rinsing thoroughly from the top down, homeowners achieve professional-grade results while safeguarding building claddings, landscaping, and equipment for years to come.
