
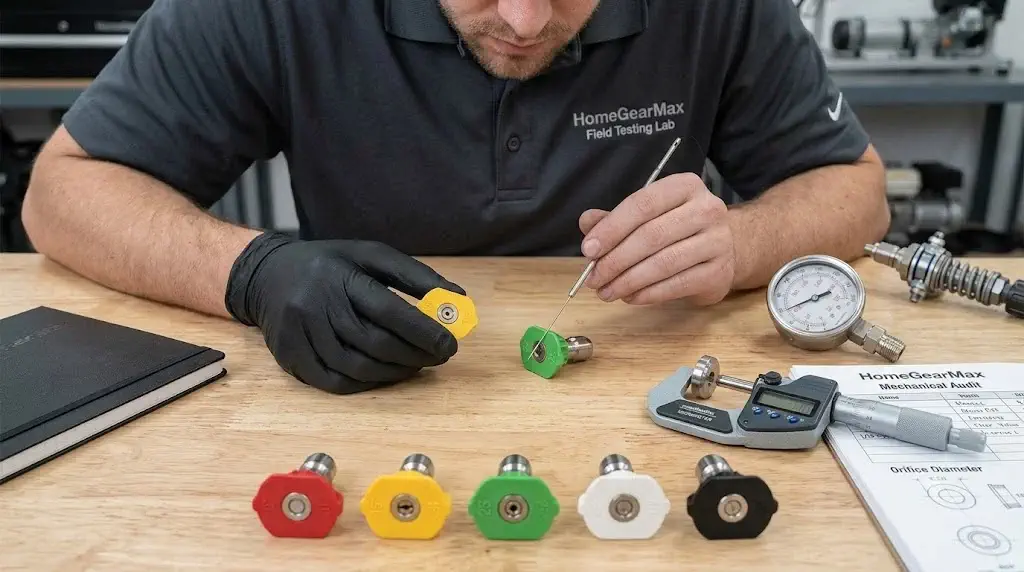
HGM FIELD TESTING LAB • HARDWARE BENCHMARKS
Calibrated Orifice Gauging • 0 Sponsored Units
Pressure Washer Nozzle Maintenance: Cleaning, Orifice Wear Diagnostics, Storage, and Sizing Calibration
Quick Reference Specification: Orifice Tolerances, Spray Geometry, and Operating Limits
Standard nozzle specifications govern flow coefficients, spray angles, pressure drops, and thermal tolerances across precision high-pressure spray tips.
Quick Answer: How Do You Maintain a Pressure Washer Nozzle?
Pressure washer nozzle maintenance requires depressurizing the hydraulic wand, clearing particulate debris using a calibrated stainless cleaning wire, backflushing the orifice under running tap water, and inspecting the tungsten or stainless opening for internal abrasive erosion. You must never enlarge nozzle orifices using drill bits, as widening the diameter by merely 10% causes an immediate 20% operating pressure drop and permanently degrades surface stripping efficiency.
Why Pressure Washer Nozzle Maintenance Matters
A pressure washer spray nozzle acts as the primary restrictive flow-metering device that converts mechanical pump displacement into dynamic impact pressure. While the pump generates fluid volume, systemic pressure builds only when that water is forced through the precision discharge orifice. When mineral scale or sand particles block this restriction, dynamic backpressure surges through the high-pressure hose, driving the unloader valve into continuous bypass oscillations. Conversely, an eroded orifice lets water escape with reduced resistance, dropping effective pressure. Review our technical guide on PSI vs GPM explained to understand how nozzle restrictions balance hydraulic circuits.
A pressure washer’s advertised PSI rating reflects peak capability against a specified orifice size, not a fixed output across all attachments. The nozzle orifice area, fluid velocity, and check valve condition collectively determine dynamic working pressure.
Pressure Washer Nozzle Maintenance at a Glance
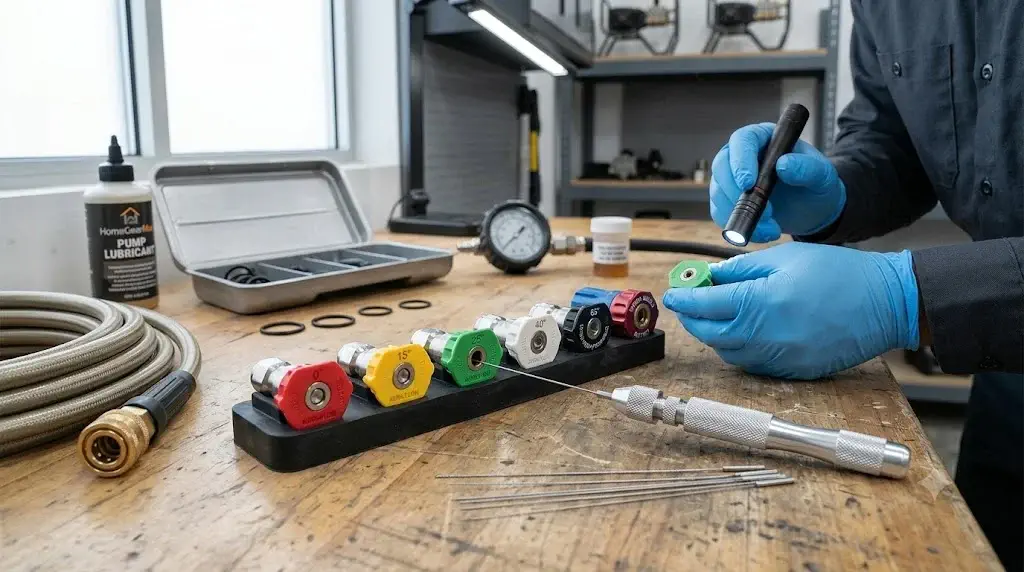
Routine maintenance tasks safeguard spray pattern symmetry and prevent premature pump unloading cycles. Inspecting your equipment according to structured intervals keeps your power washer running reliably:
Understanding Pressure Washer Nozzle Colors
Color-coded plastic collars identify the standardized spray fan angle of 1/4-inch quick-connect spray tips. While color standards remain largely consistent across North American manufacturers, never rely on color alone to judge nozzle suitability. The internal orifice size determines whether a tip delivers the correct working pressure for your pump. Refer to our detailed guide on quick-connect nozzle spray degrees for comprehensive spray fan dynamics.
What Actually Wears Out on a Pressure Washer Nozzle?
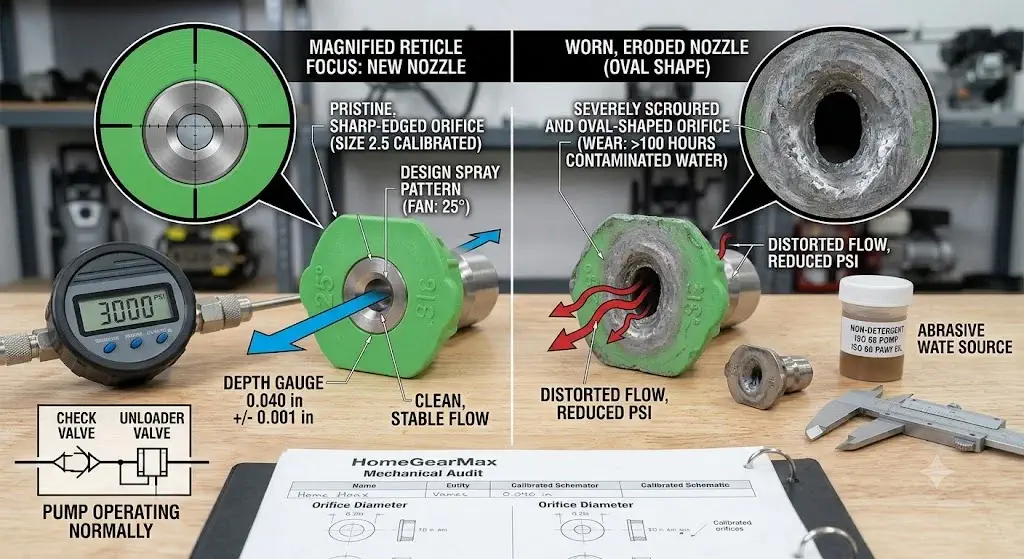
Abrasive particulate scouring gradually erodes the precision edges of the stainless steel or hardened tungsten orifice insert. As high-velocity water carries suspended microscopic silica, rust flakes, and hard minerals through the opening, the orifice undergoes hydrodynamic cavitation and physical abrasion. Over time, the circular throat expands and loses its sharp lip geometry. This expansion allows more water to pass with less restriction, reducing system backpressure and causing the spray fan to feather unpredictably.
How to Clean a Pressure Washer Nozzle
A standardized cleaning protocol removes lodged debris without scratching the precision-machined orifice bore. Always service quick-connect tips with the power washer completely shut down and depressurized:
Can You Use a Sewing Needle to Clean a Nozzle?
Using sewing needles, hardened nails, or safety pins risks deforming the precision nozzle orifice and scratching its internal walls. Household needles are made from hardened carbon steel that can easily gouge softer brass nozzle throats. If a brittle needle tip snaps off inside the narrow orifice channel, extracting the broken steel is nearly impossible, ruining the nozzle. Dedicated nozzle cleaning kits use flexible, non-tapered stainless steel wire probes designed to dislodge debris without gouging the orifice walls.
Why You Should Never Drill Out a Pressure Washer Nozzle
Drill bits irreversibly alter the hydraulic flow profile, destroying dynamic backpressure and rendering the spray tip ineffective. Even the smallest micro-drill bit leaves spiral tool marks and tears through the hardened factory surface coating. Widening the orifice drops system pressure instantly. If you need lower pressure for delicate surfaces like vinyl siding or wood, switch to a wider fan angle (such as a 40° white tip) or install an unloader-compatible regulator rather than modifying precision-machined tips.
High-Pressure Hazard Warning
Never attempt to drill, file, or ream out a pressure washer nozzle. Altering orifice geometry causes erratic water streams, structural cracking of the tip, and dangerous pressure spikes that can damage your pump and void manufacturer warranties.
How to Tell If a Pressure Washer Nozzle Is Clogged
A clogged nozzle produces unmistakable changes in the spray pattern and triggers audible surging from the pump unloader. When an obstruction blocks water flow, look for these telltale field symptoms:
- Distorted or Asymmetric Spray: The spray fan flutters, leaves gaps, or splits into two distinct angled streams.
- Erratic Wand Kicking: Severe turbulence inside the nozzle throat causes the spray wand to shudder in your hands.
- Pump Surging & Cycling: Restricting water flow spikes system backpressure, causing the unloader valve to oscillate rapidly between bypass and full-pressure modes.
- Engine Laboring / High Motor Amps: The drive motor strains under the extra hydraulic backpressure, causing electric motors to pull high amps and gas engines to bog down.
If your unit continues to pulse even after clearing the tip, consult our diagnostic guide on pressure washer pump troubleshooting to trace check valve and unloader shuttle issues.
Pressure Washer Nozzle Produces a Weak Spray
Weak spray pressure indicates an oversized nozzle, advanced orifice wear, or inadequate inlet water flow to the pump. Before you suspect internal pump seal failure, test the machine with a new, factory-calibrated spray tip. If switching to a fresh tip instantly restores normal working pressure, your old nozzle was simply worn out. If the spray remains weak across all nozzles, the issue lies upstream in the water supply or pump valves.
How to Check a Pressure Washer Nozzle for Wear
Visual inspection and dynamic inline gauge audits confirm whether a nozzle has worn beyond its usable service life. Technicians use three reliable methods to verify nozzle wear:
Examine the nozzle opening using a 10x jeweler’s loupe. A fresh nozzle features sharp, crisp edges. If the opening appears rounded, chipped, or oval-shaped, the tip is worn and ready for replacement.
Hold the wand 12 inches away from dry concrete. A healthy nozzle creates a crisp, uniform line of impact. A worn nozzle produces a feathered pattern with weak, watery outer edges.
Install an inline liquid-damped pressure gauge between the pump outlet and hose. If dynamic working pressure measures 15% to 20% below your pump’s rated output with an unobstructed tip, the orifice has expanded.
How Often Should Pressure Washer Nozzles Be Replaced?
Nozzle replacement schedules depend on cumulative run time, water mineral hardness, and the abrasiveness of your water supply. Brass quick-connect nozzles typically last 40 to 60 operating hours before orifice wear causes noticeable pressure drop. Standard hardened stainless steel tips last 120 to 180 operating hours under clean water conditions, while commercial tungsten carbide nozzles can exceed 400 operating hours. Replace nozzles whenever you measure a 10% pressure loss or notice the spray fan feathering at the edges.
How Nozzle Wear Changes PSI and GPM
Hydrodynamic laws show that water flow rate through a nozzle orifice scales with the square root of the differential pressure drop. When an orifice wears larger, fluid friction drops, and the pump displaces its rated volume against lower backpressure. This drops dynamic working PSI while total water volume (GPM) remains roughly unchanged, significantly lowering your total Cleaning Units (CU = PSI × GPM). Check our guide on what are cleaning units to see how pressure loss directly affects cleaning speed.
Why Pressure Washer Nozzle Size Matters
A nozzle’s orifice size designation corresponds to the precise fluid volume it discharges at 4,000 PSI of line pressure. For example, a size 3.0 nozzle flows exactly 3.0 GPM at 4,000 PSI. If your machine produces 2.5 GPM at 2,500 PSI, using an undersized 2.0 nozzle will spike line pressure, stall your motor, and damage internal check valves. Using an oversized 4.0 nozzle will drop working pressure below 1,500 PSI, ruining your cleaning efficiency.
Pressure Washer Nozzle Orifice Selection Chart
Calibrated nozzle sizing charts align pump operating pressure (PSI) with rated volumetric flow rate (GPM) to prevent hydraulic mismatching:
Pressure Washer Nozzle Maintenance for Electric Pressure Washers
Electric pressure washers operate on narrow flow margins that make them particularly sensitive to nozzle clogs and sizing mismatches. Because residential electric models generally draw 13 to 15 amps and deliver 1.1 to 1.76 GPM, even minor debris obstruction increases motor amperage draw. If an undersized or clogged nozzle is installed, the motor draws excess current, tripping household breakers or blowing thermal overload fuses. Keep your spray tips clean to protect electric motors from overloading.
Pressure Washer Nozzle Maintenance for Gas Pressure Washers
Gas-powered pressure washers deliver higher flow rates that accelerate nozzle orifice erosion. Higher flow velocities of 2.5 to 4.0 GPM cause faster abrasive wear across precision nozzle lips. On gas units, a severely clogged nozzle will force the unloader valve into continuous bypass, circulating water until it overheats and trips the thermal relief valve. Make checking your spray tips part of your regular engine maintenance routine.
How Dirty Water Affects Pressure Washer Nozzles
Particulate-laden water rapidly scores nozzle surfaces and clogs narrow orifice channels. Microscopic sand grains, rust flakes from municipal iron mains, and pond silt act like liquid sandpaper against the nozzle opening. When drawing water from rain barrels or open storage tanks, always install a 100-mesh garden hose pre-filter ahead of the pump. Clean the pump inlet screen regularly to stop abrasive particles before they reach the wand tip.
Can Hard Water Clog Pressure Washer Nozzles?
Hard water causes calcium carbonate and magnesium scale to build up inside hot nozzle throats. When hot high-pressure water exits the spray wand, dissolved minerals precipitate and form rock-hard crystalline crusts around the orifice edge. To dissolve stubborn limescale without scratching the precision orifice, soak scaled stainless steel tips in a 50/50 mixture of white vinegar and warm distilled water for 30 minutes, then rinse thoroughly with clean water.
How to Prevent Pressure Washer Nozzle Clogs
Proactive filtration and post-operation flushing protocols prevent particulate blockages from forming inside spray tips. Follow these four practical field habits to keep your nozzles flowing smoothly:
Inspect your 50-mesh pump inlet screen before every session to catch rust flakes and well water silt before they reach the pump.
Run water through your garden hose for 30 seconds before connecting it to the pump to flush out trapped dirt and spiderwebs.
Remove the spray nozzle and flush clean water through the wand for 15 seconds after finishing a job to clear any loose debris.
Store your spray tips in sealed holders or rubber grommets to keep workshop dust and grit out of the narrow orifice throats.
Pressure Washer Nozzle Storage and Protection
Proper storage prevents moisture corrosion, impact damage, and grit contamination on quick-connect fittings. Leaving spray tips loose in a tool bucket exposes them to dirt and impact that can nick precision brass sealing surfaces. After cleaning, blow compressed air through the tips to remove moisture and store them in rubber organizer strips mounted to the pressure washer handle. If storing equipment for the winter, check our seasonal guide on how to store a pressure washer to protect pumps and accessories from freeze damage.
Can You Leave Nozzles Attached to the Wand?
Leaving quick-connect spray tips permanently attached to the wand extension invites galvanic corrosion and seizes coupler locking balls. Dissimilar metals—like brass quick-connect plugs seated in zinc-plated steel couplers—react with residual moisture to cause galvanic corrosion. Over weeks of storage, mineral scale and oxidation weld the nozzle into the socket, seizing the locking sleeve. Always remove the nozzle after each cleaning job to let both components dry completely.
Pressure Washer Quick-Connect Fitting Maintenance
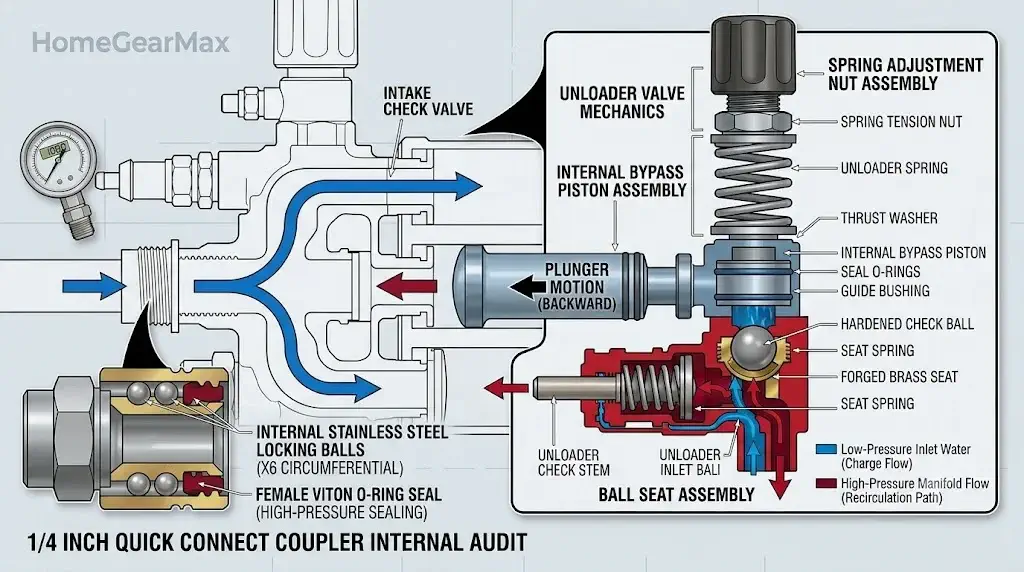
Quick-connect female couplers use stainless steel locking balls and spring-loaded brass sliding collars to lock nozzles securely under high pressure. Dirt trapped inside the locking collar prevents the stainless balls from seating fully into the nozzle plug groove. If the collar fails to snap forward completely, dynamic water pressure will eject the nozzle downrange like a projectile. Flush the collar regularly with clean water and apply a light drop of waterproof silicone grease to the locking balls once a month to keep the collar sliding smoothly.
Pressure Washer Nozzle O-Ring Maintenance
A damaged internal female coupler O-ring causes water to spray backward over the operator’s hands from the quick-connect joint. High-velocity water and repeated nozzle changes wear down the rubber seal, flattening its outer profile and causing micro-tears. When water leaks around the nozzle collar, use a dental pick to remove the old O-ring and install a new 70-durometer Buna-N or Viton replacement seal. Lubricate the new O-ring with a small dab of silicone grease to prevent tearing during installation.
Pressure Washer Nozzle Maintenance After Winter Storage
Post-winter inspections verify that freezing temperatures did not crack nozzle inserts or deform quick-connect bodies. Water left trapped inside an un-winterized nozzle expands by roughly 9% upon freezing, generating over 20,000 PSI of hydraulic pressure. This extreme force easily cracks plastic nozzle shrouds, distorts brass plugs, and loosens press-fit stainless orifice inserts. Before starting your machine in the spring, inspect all spray tips closely under good lighting and replace any nozzles showing split housings or loose inserts.
Nozzle Care After Cleaning Concrete Driveways
Concrete cleaning exposes pressure washer nozzles to heavy sand, silica dust, and abrasive slurry rebound. When cleaning driveways or operating rotary surface scrubbers, rebounding grit settles inside downward-facing nozzle tips. As soon as you finish cleaning concrete, remove each nozzle, reverse-flush the orifice under running tap water, and wipe down the quick-connect plug. Review our guide on using a pressure washer surface cleaner to balance twin-arm rotary nozzle spray heights.
Nozzle Care After Cleaning Wood Decks
Wood deck cleaning demands perfect spray pattern symmetry to avoid gouging soft cedar or pressure-treated pine boards. A partially blocked 25° green or 40° white nozzle can produce an uneven, concentrated jet that permanently furrows soft wood fibers. Always test your spray pattern on scrap lumber or an inconspicuous corner before starting on the main deck to ensure the fan is smooth, even, and free of streaks.
Pressure Washer Nozzle Maintenance for Cars
Automotive washing requires wider, gentle spray angles that lift road film without etching automotive clear coats. Using a damaged or partially clogged 40° white tip can create an erratic stream with concentrated pressure spikes that mar clear coat finishes. Inspect your nozzles before washing vehicles, maintain a minimum working distance of 16 to 18 inches, and use dedicated foam cannons for detergent application to protect your car’s paintwork.
Pressure Washer Nozzle Care for Vinyl Siding
Washing vinyl siding requires wide spray patterns to clean surfaces safely without blowing water behind overlap channels. If a nozzle develops a clogged or uneven fan, the resulting pinpoint stream can punch holes through aged, UV-brittle siding or shatter window seals. Always test your spray pattern at ground level before lifting the wand toward siding or trim boards.
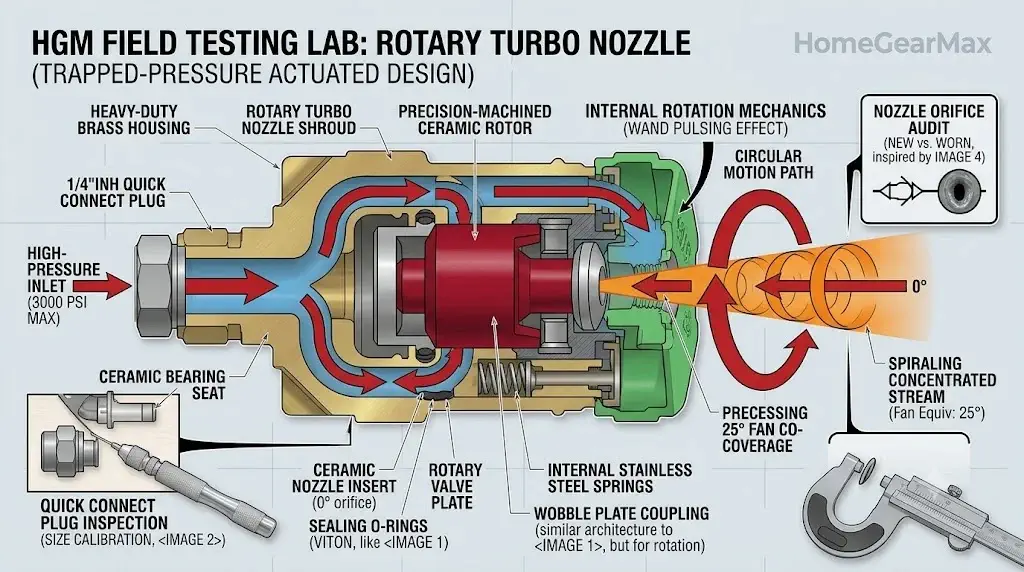
Rotary Turbo Nozzle Maintenance
Rotary turbo nozzles house a precision ceramic core that spins on an internal seat at 2,000 to 4,000 RPM, producing a rotating 0° pinpoint jet with 25° fan coverage. Silt, hard water minerals, or sudden thermal shock can seize or shatter this delicate ceramic rotor. Always point the wand downward when starting the washer to purge air before the rotor spins, and never insert steel cleaning wires into the ceramic discharge hole, as doing so will chip the ceramic bearing.
Foam Cannon vs Standard Nozzle Maintenance
Foam cannons use an internal pressed stainless wire-mesh tablet and calibrated metering jet rather than a single solid spray orifice. When thick automotive snow foams and soaps dry inside the cannon after use, surfactant polymers gel and clog the mesh aerator tablet. Always run fresh, clean water through your foam cannon bottle for 20 seconds after foaming a vehicle to rinse soap residue out of the internal mesh screen. Review our field audit on the best foam cannons to examine 1.1mm vs 1.25mm orifice metering jets.
How to Diagnose a Nozzle vs Pump Problem
A simple step-by-step diagnostic test distinguishes between a $15 worn spray tip and an expensive failed pump manifold before you invest in major repairs:
Pressure Washer Nozzle Maintenance Checklist
Pre-Operation Checks:
- Inspect the stainless orifice insert for grit, sand, or mineral deposits.
- Confirm the nozzle size number matches your pressure washer’s GPM and PSI ratings.
- Inspect the quick-connect plug stem for burrs, nicks, or excessive wear.
- Check the wand coupler O-ring to ensure it is flexible, clean, and crack-free.
Post-Operation Procedures:
- Depressurize the wand and release the nozzle from the quick-connect collar.
- Reverse-flush the nozzle under running tap water to dislodge any loose debris.
- Blow compressed air through the orifice to remove standing water.
- Store the nozzles in an enclosed rubber holder away from dirt and freezing temperatures.
Pressure Washer Nozzle Maintenance Schedule
Usage intensity dictates inspection, cleaning, and replacement intervals across residential and commercial setups:
Signs You Should Replace a Pressure Washer Nozzle
Physical deformities and persistent performance loss signal that a spray tip has reached the end of its useful life. Replace your nozzle immediately if you observe any of the following conditions:
- Cracked Plastic Guard Shrouds: Freeze expansion or heavy drops fracture the colored plastic collar, allowing the insert to vibrate loose.
- Out-of-Round Orifice: The circular opening has eroded into an oval shape, creating an uneven, feathered spray fan.
- Persistent Pressure Loss: Dynamic working pressure drops more than 10% below factory baseline on a clean water supply.
- Seized Turbo Rotors: The internal ceramic rotor in a turbo nozzle stops spinning even after thorough descaling.
- Worn Quick-Connect Plugs: The 1/4-inch plug stem develops grooves or burrs that leak water past the coupler O-ring.
Should You Buy Brass, Stainless Steel, or Ceramic Nozzles?
Metallurgy and material hardness directly determine how well a nozzle resists abrasive wear, chemical attack, and physical impact:
Pressure Washer Nozzle Maintenance Mistakes to Avoid
Common servicing mistakes can damage nozzles, decrease cleaning performance, and put unnecessary stress on your pump. Avoid these seven frequent maintenance errors:
- 1. Servicing Under Pressure: Always depressurize the spray wand before attempting to disconnect or inspect a nozzle tip.
- 2. Using Improvised Drill Bits: Drilling ruins precision orifice geometry and destroys dynamic working pressure.
- 3. Forcing Oversized Wire: Jamming thick wire into an orifice scratches the precision-machined edges, ruining the spray fan.
- 4. Ignoring Spray Asymmetry: A fluttering spray fan is an early warning sign of debris buildup or internal erosion.
- 5. Mixing Orifice Sizes: Keep tips sorted by size number to prevent accidentally choking or overloading your pump.
- 6. Storing Tips Loose in Dirty Buckets: Dust and grit from dirty toolboxes collect inside nozzle openings, causing immediate clogs on startup.
- 7. Cranking Up the Unloader: Never tighten unloader valve springs to compensate for pressure lost through a worn nozzle.
Pressure Washer Nozzle Sizing for US Homeowners
US residential water systems present flow constraints that must be factored into nozzle selection and sizing. Most outdoor residential spigots in the United States deliver 4 to 6 GPM through 5/8-inch garden hoses at static pressures between 40 and 60 PSI. Using an oversized nozzle drops dynamic working pressure significantly below advertised ratings. Always base your nozzle orifice selection on verified working GPM and working PSI rather than the inflated “peak PSI” figures printed on retail packaging.
How Nozzle Maintenance Directly Controls Cleaning Units
Cleaning unit ratings quantify true mechanical cleaning power by multiplying operating pressure by fluid flow. While PSI loosens dirt bonds, GPM carries loosened debris away. When a worn nozzle lowers working pressure from 3,000 PSI down to 2,400 PSI at 2.5 GPM, your total Cleaning Units drop from 7,500 down to 6,000 CU—a 20% loss in cleaning efficiency. Maintaining sharp, calibrated nozzles keeps your machine delivering its full rated cleaning performance.
Pressure Washer Nozzle Troubleshooting Flowchart
A step-by-step diagnostic workflow quickly isolates nozzle obstructions from pump and line problems:
• Yes: The nozzle is healthy. Continue operation.
• No: Stop the machine, depressurize the wand, and proceed to Step 2.
• Yes: Clear with a stainless wire probe and reverse-flush under running tap water.
• No: Proceed to Step 3.
• Yes: The original tip orifice has expanded from wear. Discard and replace it.
• No: Proceed to Step 4.
• Inspect your garden hose flow, clean the pump inlet strainer, check for unloader bypass leakage, and inspect internal pump check valves.
When Nozzle Maintenance Is Not Enough
Persistent pressure loss across all spray tips indicates upstream mechanical problems rather than simple nozzle wear. If installing brand-new, correctly sized spray tips fails to restore normal pressure, inspect the following primary hydraulic components:
- Inlet Screen Clogging: A 50-mesh screen blocked by algae or rust starves the pump and causes cavitation.
- Supply Hose Kinking: Undersized or soft 1/2-inch hoses can collapse under suction, cutting off water volume.
- Trapped Manifold Air: Air pockets compress under piston strokes, preventing check valves from closing cleanly.
- Unloader Bypass Leakage: Grit trapped in the unloader bypass seat bleeds high-pressure water back to the suction inlet.
- Broken Check Valve Springs: Damaged check valves allow pressurized water to slip backward into the intake stroke.
Frequently Asked Questions: Spray Nozzle Maintenance
How often should I clean my pressure washer nozzle?
How do I clean a clogged pressure washer nozzle?
Can I use a needle to unclog a pressure washer nozzle?
Can I drill out a pressure washer nozzle?
How do I know if my pressure washer nozzle is worn?
Can a worn pressure washer nozzle cause low pressure?
Why is my pressure washer nozzle spraying sideways?
Why does my pressure washer pulse after changing the nozzle?
Do pressure washer nozzles wear out?
Can hard water damage pressure washer nozzles?
Does a pressure washer nozzle affect GPM?
Does a pressure washer nozzle affect PSI?
Should I replace all my pressure washer nozzles at once?
Should pressure washer nozzles be stored wet?
Can I use the same nozzle for every cleaning job?
Final Field Verdict: Precision Nozzle Care
Regular nozzle maintenance is the easiest, most cost-effective way to preserve pump health and maintain maximum cleaning performance. Treating quick-connect spray tips as precision-metered hydraulic components rather than simple colored caps prevents unloader bypass failures and ensures clean, even spray patterns. Keep a brand-new, factory-calibrated test tip in your toolbox to quickly diagnose whether low pressure stems from a simple worn nozzle or an internal pump issue.
